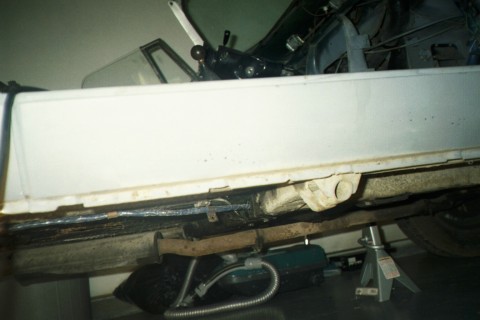
Ain't weekends grand! I dropped the gas tank and pulled the radiator. Originally I had intended to take the fuel tank and have it cleaned but I think it's in good shape. I'm glad I dropped it though. There's the beginnings of a rust problem there and I plan to nip it in the bud. I'll take the radiator and have it cleaned, pressure tested and repaired as needed. Hopefully there are no leaks, but we'll see.
I also cut out most of the driver's side dogleg. If I have time this week, I'll do some more cutting and fine tuning in preparation for welding. I will also be rustproofing the rockers before they are made inaccessible by the new doglegs.
I still need to source some sheet metal for floor repairs. Some of the worst rust on the car is in the drivers side floor, but that should be a very simple fix. I'll take some pictures of the floor this week and post them as soon as they are developed.
Sunday, September 19, 2004
Saturday, September 18, 2004

Here is a good representation of the rust damage in the doglegs. I've only torn into the passenger side, but I'm fairly certain I will find similar damage on the driver side. As you can see in future pictures, I've cut away the entire dogleg section. After grinding the surface rust off of the rocker, it appears to be in pretty good condition. After some rust proofing, I'll be ready to weld in the new panel,
Wednesday, September 15, 2004
9/15/04 Progress Report
I've been pretty busy with other things, like a new job and a family trip to Memphis, so not much has happenned on the B in the last couple of weeks.
I did some more work on the passenger side dogleg. I cut out some more of the metal that will be replaced by the new panel and ground down the rocker (underneath where the dogleg was) to shiny new metal. There are a few more holes than I would like, but I think it is structurally sound, so I'm going to protect it from future rust and leave it as is. I've drilled out all of the spotwelds and removed the strips of metal that were left along the bottom of the car and the edge of the wheel well.
As for replacing the dogleg, well, I think I may buy a welder and do it myself. I've always wanted to know how to weld and as they say, there's no time like the present. So I'm still contemplating that. My neighbor owns a welding repair/supply shop and has offered to help me, so I may take him up on that. We'll just see how things are progressing in a few weeks.
About the pictures I promised. Well, we sent them off to snapfish on Monday (9/13) so we should have something soon. I'll post them as soon as I have something.
A couple of other minor things.
The alternator that was in the car didn't match the wiring harness. The alt that was in the car was a 3 prong while the wiring harness was for a 5. So, I traded alternators with The Autoist for one that would work with the harness that is in the car.
Also, I needed a wrench to remove the wire knockoffs. He also brought me one of those. It took some serious pounding with my 5lb hammer, but they came right off without much drama. Since I was over there anyway, I've removed the pass side brake drum just to see what's in there. I found spiderwebs. Actually, other than the bugs, it looks fairly clean. Of course, I'll be rebuilding/replacing all of that but it's good to know everything seems to be in order, just for the sake of knowing.
My most immediate issues are to get the doglegs replaced and the floor patched up. After that, I'll be rebuilding the brakes, then I'll go through the fuel and cooling systems. There are some other minor body issues, but I haven't decided when I'll be taking those on yet. Definitely before paint. I don't know if I want to try to get it on the road before that, or just do the whole thing before even attempting to drive. I have a feeling I'm going to want to be on the road by spring of 2005. I don't know how finished I will be by then though. I may drive it for a summer in primer and work on it a little at a time and then take it back off the road for paint next winter. Again, I just don't know how much time most of this stuff is going to take. Progress has been good so far, but I don't have a crystal ball.
Tuesday, September 07, 2004
Long Weekend
The Labor day holiday provided some much needed garage time. The 3 month old was in the garage with me most of the time. I've found she loves it out here. I don't know if it's the fumes, the noise, or the fact that daddy's always doing something funny.
Anyway, what have I done?
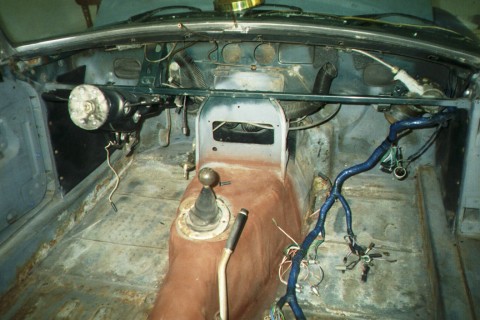
- Removed dash
- Removed windshield
- Cut out most of passenger side dogleg
The dash was a real pain. Several hours of laying on my back, bumping my head on gas, brake and clutch pedals and getting dust in my eyes. I think I'm going to rig up something like this so that it is easier in the future. It is inevitable that I will remove it again, so I might as well make it as easy as possible. As I had though, the nut directly above the steering column was not easy to get to. Thankfully, once I got it broken free I was able to turn it with my fingers. Long fingers are an asset in MGB dash removal.
Windshield removal was simple after the dash was out. I have to remember to put it back before the dash goes back in. The mounting bolts are easily reached with the dash out, but I can see how they would be difficult to get to with the dash in.
In the might as well category, I'll be replacing the vinyl that is glued to the car under the top of the dash. It came off very easily in one piece. Now I'm in the process of removing all of the leftover glue from the car so I can glue the new piece down. I figure I can get the material from a fabric store. I might get my wife to help me with the cutting amd gluing. That's her thing, I know she can do a much better job that I can.
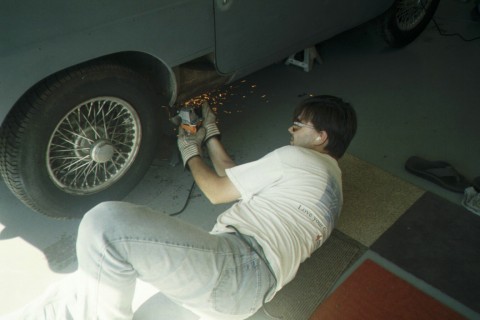
Cutting metal ROCKS! Sparks, noise, the smell of burning flesh. Okay, so maybe the smell of burning flesh isn't supposed to happen. Those little sparks are hot. They don't hurt though, so I just went at it with short sleeves. I didn't want to catch my hairy legs on fire though, so I did change into jeans. I took the angle grinder with a metal cutoff wheel to the doglegs. It cut like a hot knife through butter. I was thoroughly impressed.
Apparently the three month old was also impressed. I took her inside because of the noise, but apparently she decided to compete with the noise of the grinder inside. My wife came out and informed me that she was gleefully squealing at the top of her lungs. I heard it later, and she did sound very much like the angle grinder cutting sheet metal. This is the first time she has done this, so we can only assume she was mimicking the sound she was hearing.
The spotwelds along the inside of the wheel well still need to be drilled out and there is still some metal remaining in the curve of the door. There are at least 20 spot welds in the wheel well. That will take awhile. After that, I'll repeat the whole process on the other side and then will be ready for the new doglegs to be welded in.
I've taken several pictures of the process, but will have to wait until they are developed to post them here.
Anyway, what have I done?
- Removed dash
- Removed windshield
- Cut out most of passenger side dogleg
The dash was a real pain. Several hours of laying on my back, bumping my head on gas, brake and clutch pedals and getting dust in my eyes. I think I'm going to rig up something like this so that it is easier in the future. It is inevitable that I will remove it again, so I might as well make it as easy as possible. As I had though, the nut directly above the steering column was not easy to get to. Thankfully, once I got it broken free I was able to turn it with my fingers. Long fingers are an asset in MGB dash removal.
Windshield removal was simple after the dash was out. I have to remember to put it back before the dash goes back in. The mounting bolts are easily reached with the dash out, but I can see how they would be difficult to get to with the dash in.
In the might as well category, I'll be replacing the vinyl that is glued to the car under the top of the dash. It came off very easily in one piece. Now I'm in the process of removing all of the leftover glue from the car so I can glue the new piece down. I figure I can get the material from a fabric store. I might get my wife to help me with the cutting amd gluing. That's her thing, I know she can do a much better job that I can.
Cutting metal ROCKS! Sparks, noise, the smell of burning flesh. Okay, so maybe the smell of burning flesh isn't supposed to happen. Those little sparks are hot. They don't hurt though, so I just went at it with short sleeves. I didn't want to catch my hairy legs on fire though, so I did change into jeans. I took the angle grinder with a metal cutoff wheel to the doglegs. It cut like a hot knife through butter. I was thoroughly impressed.
Apparently the three month old was also impressed. I took her inside because of the noise, but apparently she decided to compete with the noise of the grinder inside. My wife came out and informed me that she was gleefully squealing at the top of her lungs. I heard it later, and she did sound very much like the angle grinder cutting sheet metal. This is the first time she has done this, so we can only assume she was mimicking the sound she was hearing.
The spotwelds along the inside of the wheel well still need to be drilled out and there is still some metal remaining in the curve of the door. There are at least 20 spot welds in the wheel well. That will take awhile. After that, I'll repeat the whole process on the other side and then will be ready for the new doglegs to be welded in.
I've taken several pictures of the process, but will have to wait until they are developed to post them here.
Not much progress, still evaluating
I didn't really expect to make much progress over the last few days, and I've not exceeded my expectations. I have gotten a start on taking the dash out to replace the wiring harness that was cut.
The nuts that need to be removed to get the dash out are somewhat hard to get to. The key is to remove anything that could be in the way. So far I've taken out the glovebox and the vents in the center of the dash. The wiper motor was also already hanging loose. I think if it hadn't been, I might have had to move it also. Being able to move it around helped me reach the first nut on the drivers side. Removing those things allowed access to the 3 passenger side mounting points. I have a feeling the 3 on the drivers side may be a little more difficult, as there is more wiring and stuff to get in the way. Hopefully, I'll get started on that tonight when everyone goes to bed, as that has become the only time I get to myself anymore.
Once I've removed the dash, I'll be able to easily remove the windshield which will be necessary before I take her to be painted. That's getting a little ahead of myself, though. Painting is way down the priority list, just before the interior.
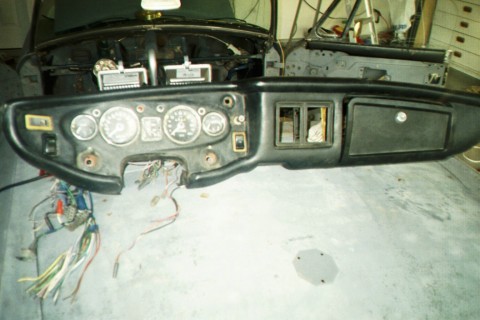
This dash isn't exactly like mine, but the mounting points are the same, so provides a good reference. #6 was easy. #5 is immediately above the glove box, # 4 is immediately above the air vents. I haven't done 1, 2, or 3 yet. 1 looks easy. 2 looks to be a real pain, as it's directly above the steering column, which can't be moved without great effort. I'll probably have to use a swiveling extension of some sort to get up in there. I'm not sure about #3. I'll just have to see what's in the way up there.
As I take off parts, I am putting them in plastic zip-loc bags and labeling them with a permanent marker. I'm sure this will help when it comes time to re-assemble. Now I just need to figure out a way to keep track of all the zip loc bags I'm accumulating.
I've also removed the alternator, as it is the wrong one for the new harness. Turns out it will be easier to remove the alternator and trade for the right one than it will be to deal with the wiring harness. Alternator removal took all of 10 minutes. Two bolts at the swivel point and one on the adjustment bracket and zip-a-dee-doo-dah, she was out.
I got started removing the radiator as well. It's almost out, but one of the radiator mounting bolts is rusted to the point it won't move, so I'll have to cut it out.
Speaking of cutting, I'll be visiting our local Harbor Freight tools soon to purchase a new angle grinder. I'll use that to cut the radiator mounting bold and more importantly to cut out the rusted sheet metal in the floor pan and dog legs.
The nuts that need to be removed to get the dash out are somewhat hard to get to. The key is to remove anything that could be in the way. So far I've taken out the glovebox and the vents in the center of the dash. The wiper motor was also already hanging loose. I think if it hadn't been, I might have had to move it also. Being able to move it around helped me reach the first nut on the drivers side. Removing those things allowed access to the 3 passenger side mounting points. I have a feeling the 3 on the drivers side may be a little more difficult, as there is more wiring and stuff to get in the way. Hopefully, I'll get started on that tonight when everyone goes to bed, as that has become the only time I get to myself anymore.
Once I've removed the dash, I'll be able to easily remove the windshield which will be necessary before I take her to be painted. That's getting a little ahead of myself, though. Painting is way down the priority list, just before the interior.
This dash isn't exactly like mine, but the mounting points are the same, so provides a good reference. #6 was easy. #5 is immediately above the glove box, # 4 is immediately above the air vents. I haven't done 1, 2, or 3 yet. 1 looks easy. 2 looks to be a real pain, as it's directly above the steering column, which can't be moved without great effort. I'll probably have to use a swiveling extension of some sort to get up in there. I'm not sure about #3. I'll just have to see what's in the way up there.
As I take off parts, I am putting them in plastic zip-loc bags and labeling them with a permanent marker. I'm sure this will help when it comes time to re-assemble. Now I just need to figure out a way to keep track of all the zip loc bags I'm accumulating.
I've also removed the alternator, as it is the wrong one for the new harness. Turns out it will be easier to remove the alternator and trade for the right one than it will be to deal with the wiring harness. Alternator removal took all of 10 minutes. Two bolts at the swivel point and one on the adjustment bracket and zip-a-dee-doo-dah, she was out.
I got started removing the radiator as well. It's almost out, but one of the radiator mounting bolts is rusted to the point it won't move, so I'll have to cut it out.
Speaking of cutting, I'll be visiting our local Harbor Freight tools soon to purchase a new angle grinder. I'll use that to cut the radiator mounting bold and more importantly to cut out the rusted sheet metal in the floor pan and dog legs.
First pictures
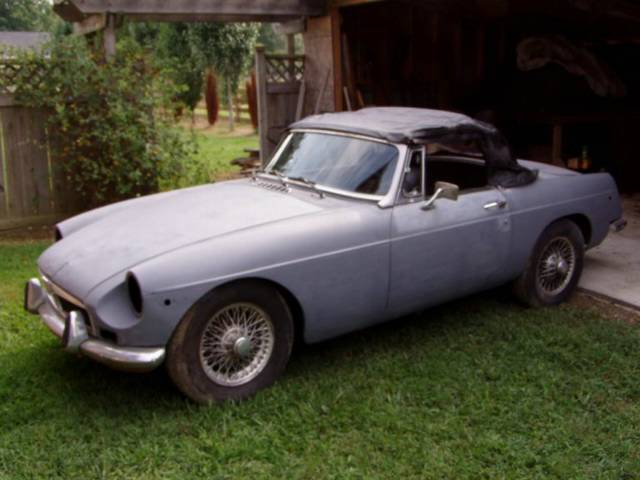
Here is a picture taken before I picked it up. This photo was included in the advert. The lighting's not great, but you can tell that it's in primer. The top is just temporarily hung over the frame. Notice all trim is removed.
In the B-ginning
This will be the ongoing account of the "restoration" of my 1972 MGB. First, let me define restoration because it means something different to everybody. For my purposes, I will use the term restoration to mean the return of my MGB to daily driver status. I want to bring it back to a level of comfort, safety, and reliability that will give me confidence that I will be able to drive the car around town or cross-country with reasonable confidence that no major problems will occur (like wheels falling off, or me falling through the floor). On the other hand, I don't want a show car that I'm afraid to drive for fear of the tiniest scratch either.
Given that definition, I will make a list of things that need to be done to get the car to that level.
Here is that list:
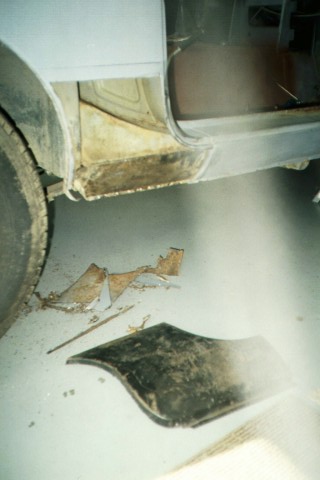
1. Repair rust in doglegs on both sides of the car. This will involve cutting out the dogleg sheet metal and welding in a new panel. Don't worry, no animals will be harmed in this process. For those of you who don't know, the dogleg is the sheet metal at the very bottom between the back of the door and the wheel well.
2. Repair rust in floor. There are several rust spots but not enough to warrant complete floor replacement. Someone has already replaced the forward section of the floor pans with some pretty sturdy looking sheet metal. The replacement panels were pop-riveted in. I think I will continue with this method in the remaining floor repairs.
3. Connect replacement wiring harness. Somebody had taken the old wiring harness and cut every wire right under the passenger side dash. Somebody was either ticked off at the car, or at the owner of the car, or as a friend of mine put it, "drunk". I don't know which, I'll let you know if I find out. Anyway, the car was sold to me with a replacement harness in place, just not plugged into anything, so I'll be going through all of the electric system as I do all of the other re-assembly. First, I'm plugging in everything under the dash, which will require dash removal.
4. Go through all of the mechanical/hydraulic systems; brakes, clutch, engine, transmission, fuel delivery, etc. and return to reliable operating condition
5. Repair minor body damage. There are several parking lot dings and other minor body issues that will need to be taken care of while the car is still apart.
6. All of the body trim, lights, etc., have been removed and the car is in gray primer. Once the metal work and dent repairs are complete, I'll be removing the bumpers and windshield and taking the car to be painted. My wife is very supportive of this project and is excited that I finally have the chance to restore an MGB. She likes the idea of something in the neighborhood of Old English White, so I'm thinking of going with that and a beige interior. I think that's a very classy color scheme, I think it will really look nice with the chrome trim and wire wheels.
7. Speaking of the interior, it's bare. The dash is in good shape, but that's about it. I have seats, but they are very rough…not fit to sit in...or even near. I saw some interesting mold on one of them. The seats could be deemed either a biohazard or a wildlife habitat. So, I'll be buying a complete interior kit, seats, carpets, door panels, the whole she-bang.
The list will most likely change as I get into the details and run into the might as wells.
The story of the car as it was given to me is as follows:
The car was parked because it started running hot. Nothing has been done to it since, other than somebody cutting the wiring harness. The guy I bought it from took it down to metal in places to make sure the body was solid and has resprayed with gray primer. It appears to have been teal blue originally. There is teal blue overspray under the dash and there is teal blue in the engine compartment. The interior was possibly a tan/brown color judging from the seats, but they could have been replaced since the car was new.
So that's the story. I'll post pictures as I get them developed and scanned, as I am still in the 20th century and do not own a digital camera.
Given that definition, I will make a list of things that need to be done to get the car to that level.
Here is that list:
1. Repair rust in doglegs on both sides of the car. This will involve cutting out the dogleg sheet metal and welding in a new panel. Don't worry, no animals will be harmed in this process. For those of you who don't know, the dogleg is the sheet metal at the very bottom between the back of the door and the wheel well.
2. Repair rust in floor. There are several rust spots but not enough to warrant complete floor replacement. Someone has already replaced the forward section of the floor pans with some pretty sturdy looking sheet metal. The replacement panels were pop-riveted in. I think I will continue with this method in the remaining floor repairs.
3. Connect replacement wiring harness. Somebody had taken the old wiring harness and cut every wire right under the passenger side dash. Somebody was either ticked off at the car, or at the owner of the car, or as a friend of mine put it, "drunk". I don't know which, I'll let you know if I find out. Anyway, the car was sold to me with a replacement harness in place, just not plugged into anything, so I'll be going through all of the electric system as I do all of the other re-assembly. First, I'm plugging in everything under the dash, which will require dash removal.
4. Go through all of the mechanical/hydraulic systems; brakes, clutch, engine, transmission, fuel delivery, etc. and return to reliable operating condition
5. Repair minor body damage. There are several parking lot dings and other minor body issues that will need to be taken care of while the car is still apart.
6. All of the body trim, lights, etc., have been removed and the car is in gray primer. Once the metal work and dent repairs are complete, I'll be removing the bumpers and windshield and taking the car to be painted. My wife is very supportive of this project and is excited that I finally have the chance to restore an MGB. She likes the idea of something in the neighborhood of Old English White, so I'm thinking of going with that and a beige interior. I think that's a very classy color scheme, I think it will really look nice with the chrome trim and wire wheels.
7. Speaking of the interior, it's bare. The dash is in good shape, but that's about it. I have seats, but they are very rough…not fit to sit in...or even near. I saw some interesting mold on one of them. The seats could be deemed either a biohazard or a wildlife habitat. So, I'll be buying a complete interior kit, seats, carpets, door panels, the whole she-bang.
The list will most likely change as I get into the details and run into the might as wells.
The story of the car as it was given to me is as follows:
The car was parked because it started running hot. Nothing has been done to it since, other than somebody cutting the wiring harness. The guy I bought it from took it down to metal in places to make sure the body was solid and has resprayed with gray primer. It appears to have been teal blue originally. There is teal blue overspray under the dash and there is teal blue in the engine compartment. The interior was possibly a tan/brown color judging from the seats, but they could have been replaced since the car was new.
So that's the story. I'll post pictures as I get them developed and scanned, as I am still in the 20th century and do not own a digital camera.
Subscribe to:
Posts (Atom)