Monday, August 18, 2008

More Progress

I've made some significant progress over the last few weeks. Paint was sprayed in the engine bay. It looks great. Funny how what looks just acceptable on the body of a car can look great in an engine bay. It's no show car, mind you, but I'm pretty satisfied with the work I've done. Besides, the intent is for this car to be my driver, not a garage queen. I'm planning to put some miles on the car and I don't want to be afraid to do that for fear of scratching expensive paint. Nevermind that I've already put more into this car that it was sold new for back in 1971 or 72. Granted, that's not much money when you think about how much value the dollar has lost since then.

So what have I done beside paint the bay? I have my brake hydraulics hooked back up, along with the clutch master and slave cylinder. I've been cleaning and painting all of the small things that are going back into the bay. I sanded, steel wooled, and then clear coated all of the brake, clutch and fuel lines that are visible. Clear coat was to keep them from corroding so quickly in the future.

I made my big parts order last week from Moss Motors via The Autoist. I picked the parts up a couple days ago. This included my complete interior, main engine bearings, rod bearings, motor mounts, lots of miscellaneous MGB specific hardware, seals, gaskets, and the oh so important heater core (this is going to be my year round daily driver so I have to have heat!). Everything looked great and service at The Autoist was excellent as always.

I have already received my clutch kit from Bob at Brittek and some exhaust paint from Eastwood. I have a friend at work that is going to sand blast my exhaust manifold for me, then it will get a couple of heavy coats of Eastwood stainless steel gray high temp exhaust coating. If nothing else the engine will look pretty.

Here are a few pictures of the progress to date, and my lovely newly rebuilt carburetors.

Here's the picture of the engine bay before. I had started work at this point but you can tell how nasty things were.


Here's a picture after much degreasing, cleaning and sanding and some reassembly. It's not perfect, but it will be much more of a pleasure to raise the hood now than it was before.


Here's the engine that will fill the large empty hole in the picture above. New bearings started going in last night and will hopefully be completed tonight or tomorrow. Then I can start buttoning the unit back up to get it ready to drop back in.


And here's what will deliver the air/fuel mixture to be burned in healthy quantities as I cruise around with the top down. They were professionaly cleaned and rebuilt. Once I install them and find out how they work, I'll post the rebuilders name and a review.

Friday, June 20, 2008

Update

Just a couple pictures to keep the blog alive. And some info on what I've been up to.

I realized there's no picture of the B after paint, so here it is. It's hard to photograph without it just looking like your average white car. It's not nearly as white as it looks. I've pasted in a picture of a Pepper White Mini to show the actual color. It gives it a very classic British look with the wire wheels.


I sent my carburetors off on Wednesday for a rebuild. They'll be getting a full cleaning and polishing, new piston springs, metering needles and jets. The interconnecting linkage will be plated and new throttle shafts will be installed. I'm looking forward to getting them back.

Here's a picture of the engine bay before cleaning. It's really nasty and covered in several layers of grease and oil and road grime. I've scrubbed for several hours and it's still not clean. It's going to take some time. Also off to the right you can see the exhaust system that has been removed. I haven't decided what to do about that yet. I'll probably just reinstall it as is for now.


Other than that, I've been cleaning, cleaning, cleaning lately. The engine is almost ready for primer and paint. I picked up some Duplicolor Ford Dark Canyon Red at a local parts store last weekend. I test sprayed a spot against the old original MG engine red and it's a perfect match.


This is the goal I am shooting for. This, of course, is not my engine or car, but it's what mine will look like when complete. This, I believe, is a picture of an MGB engine built by Hap Waldrop of ACME Speed Shop fame. Pretty, huh?


Monday, June 09, 2008

One Nasty Transmission and Five Worn Out Bearings

I've been working on cleaning up the engine and transmission. I'll be painting the engine its original color while I have it out. I'll also be painting the engine bay the same color as the rest of the car.

I have a few more pictures to share of what I found and what I did when the engine and transmission came out of the car.


The engine main bearings are very worn. Possibly from running with no or low oil pressure. The first time I started the engine, it didn't have oil pressure because of the broken oil pump. I don't think all of this damage was caused by that, but it couldn't have helped. This bearing (the copper colored concave surface) is supposed to be perfectly smooth and shiny like the convex surface on the crankshaft. It has ridges that you can feel with a fingernail and is worn down into the copper. Catastrophic bearing failure was probably imminent. After seeing this, I'm actually glad that the release bearing failed when it did. This could have been a much uglier scene had I continued to drive the car in this condition. We're talking metal bits here and there and possibly pieces welded together because of the heat of the unlubricated friction. There are 5 of these main bearings in this engine and I'll be replacing all of them. That means the crankshaft has to come out.

Here's the transmission in progress and after cleaning. It's pretty clean. Next to tackle is the engine block. I'll be getting it as clean as possible and then priming and painting in the next week or so.


The plan is to get everything cleaned up, find all of the problems, and then make one big parts order for everything I need. I expect that will happen in July.

While I have it apart, I'm sending the dual SU HIF4 carburetors off to be rebuilt by an expert. I need a new radiator, heater core, and fuel tank while I'm at it. I'll also be replacing as much of the interior as the budget allows. In order to save a little money I'm going to try to pick up as many used parts as I can. Any engine internals will be the best new parts I can buy, though. That's not the place to be cheap.

Wednesday, June 04, 2008

Memorial Day Weekend 2008 Progress

So, where am I now? Since the best wife in the world agreed to spending the money to get the B back on the road, I've pulled the engine and am preparing it for a new clutch and a general refreshing.

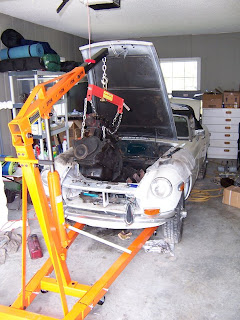
Here's a picture of the engine coming out of the car. It was easier than anticipated. I hope getting it all back together proves to be as easy as taking it apart!

The biggest part of the job was making sure all of the wires were disconnected and then labeled so I would know where they go when the engine goes back in.

The rest of the job was pretty easy. It's important to remember to let the tools do the work they are designed for and to be patient.

Notice how nasty the engine is. That will be changing soon.


Here's the engine mounted to the engine stand sans transmission. To get it to this point I had to remove the transmission, the clutch, the flywheel, and the engine backing plate. Removing the flywheel was a challenge. It required liberal doses of PB'laster and alot of pounding away with the impact wrench.

I went to Lowes to find some bolts long enough to fit through the engine stand sleeves and into the engine plate mounting holes on the back of the engine. Lovely wife proved to be good at searching through the bins of bolts at Lowes for fine threaded 3/8 inch hex-head bolts. I was proud.

Notice again how incredibly nasty it is. I'm looking forward to posting pictures after I have it cleaned and painted.


This is why the clutch stopped working. It wasn't the clutch itself that had worn out, it was the release (aka throw-out) bearing.

When the clutch pedal is pressed, the release bearing presses against the center of a flexible rotating diaphragm. As the center is pressed towards the engine, the outer edges, which are attached to the clutch pressure plate, are pulled away from the engine, acting as a lever. This disengages the rotating flywheel from the transmission.

The bearing had likely become brittle from sitting for several years and couldn't handle the stress of being used again and broke into several tiny bits.

This pile of what looks like greasy gravels is the remains of the carbon bearing. It's greasy because the inside of the transmission bellhousing was coated in about 1/4 inch of grease and oil.


More to come...

Monday, June 02, 2008

Long Time No Post

Wow, it's been awhile, huh? 3 1/2 years? Really? It doesn't seem like that long.

Here's a little update on what happened between 10/26/2004 and today:

1. I went through the brakes and clutch, replacing both master cylinders and the clutch slave.

2. Stripped it down to bare metal and painted it BMW Pepper White. I'll post a picture shortly of the car with paint. It's a common color on the new Mini's. It's a creamy white color.

3. Replaced the pistons. One had a hole in it. I didn't see any damage to the cylinder bore, so I decided to just put in four new pistons and rings and go with it. The budget didn't (and still doesn't) allow for a complete rebuild.

4. Since I had the oil pan off anyway, I replaced the rod bearings while I was at it. It's an easy job with the engine in the car if you don't mind getting dirty.

5. When I pulled the oil pan I noticed why I wasn't able to get any oil pressure, despite what seemed like hours of battery draining cranking. The body of the oil pump was broken in half. If I find the picture I'll post it. It's really bizarre. I think someone must have tried to jack the car using the oil pan, as it was a little dented in. The weight of the car would have been on the oil pump. The oil pump was just not designed to support the weight of the entire car. Imagine that.

6. Replaced the broken piece of the oil pump thanks to a kind soul (can't remember his name) on The MG Experience.

7. Compression tested the engine. Compression is on the low side at between 125 & 130, but is consistent across all 4 cylinders.

8. Finally got it started, titled, and registered.

9. Added seatbelts, put some temporary covers over the decaying seats, and took her for a drive or two.

10. Blew out the clutch throw out bearing on the first real drive. Must have been pretty brittle from sitting all that time. It also probably had alot of miles on it.

11. Parked the car, frustrated in the knowledge that I would have to pull the engine.

12. Moved several hundred miles, dragging the B behind a Uhaul.

13. Parked the B outside (poor thing) behind a shed while living in a rental without a garage.

14. Moved a few more miles to a nicer rental with a garage.

15. Realized once again that I have the best wife in the whole world when she didn't hesitate to encourage me to spend the money to get the B back on the road.

Where am I now? Check back soon for big news and dirty pictures of MGB parts spread here and yon.